Breakaway Games' Austerlitz: Napoleon's Greatest Victory portrays the sweeping panorama of this pivotal battle.
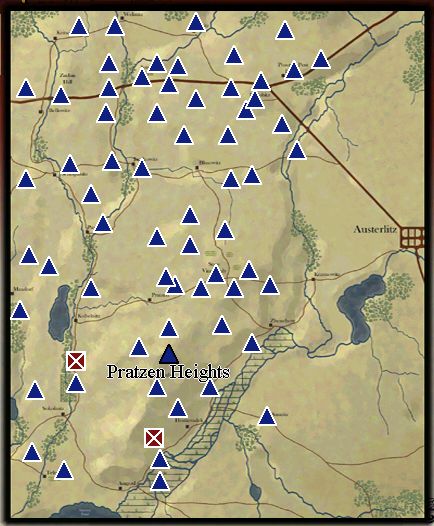
The center of the battlefield is the town of Pratzen, just at the foot of the Pratzen Heights.

by Gary Morgan
The battle of Austerlitz on December 1, 1805, was a pivotal engagement, which many historians characterized as "Napoleon's Greatest Victory". The battle culminated the Ulm-Austerlitz Campaign, where Napoleon's forces plunged deep into Austria, after sweeping through Bavaria to follow up the incredible strategic encirclement of Mack's army at Ulm. This campaign was particularly noteworthy since Napoleon was up against the Austrians and their Russian allies, plus Prussia was beginning to mobilize her forces (he went there next, fighting the battle of Jena-Auerstadt). Time was of the essence and Napoleon pressed straight for Vienna. After taking Vienna, Napoleon swung north through Brunn then east to engage the approaching Allied Army. The town of Austerlitz is east of the battlefield, with Brunn to the west (Napoleon's depot and rear area), and the capital of Vienna to the south firmly in French control.
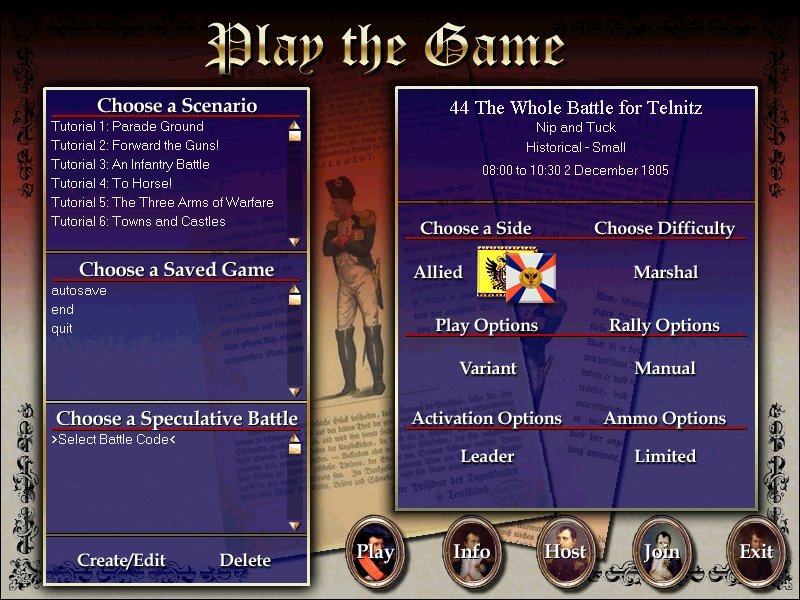
Breakaway Games' Austerlitz: Napoleon's Greatest Victory portrays the sweeping panorama of this pivotal battle and there are a great many diverse and unique types of terrain over which the opposing armies will clash, regardless of scenario size and type. Most Napoleonic tacticians are familiar with basic terrain types from playing other wargames. The preview of Austerlitz: Napoleon's Greatest Victory, consists of a documented play example or after-action report detailing how to win as the French forces when playing one of the two scenarios featured in the demo version of the game. These scenarios also appear in the published version of the game and the preview presents some basic Napoleonic tactics which may prove helpful to player success and enjoyment when playing this game.
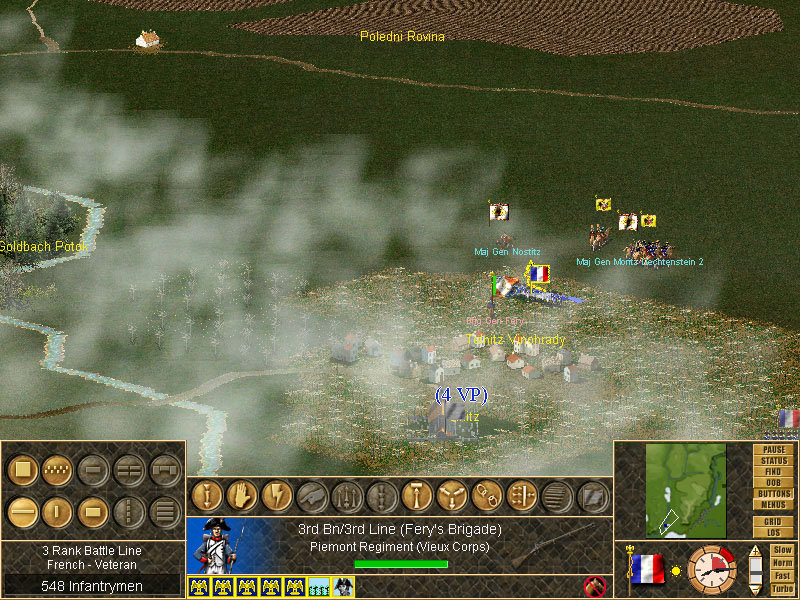
Several factors set the battle of Austerlitz apart from other Napoleonic battles, and these are worth discussing and exploring through game play. Experienced players may intuitively recognize the advantages of positioning on higher elevation terrain (particularly for artillery) and the intrinsic combat benefits for infantry in woods and cavalry on open ground. For instance, players should avoid taking cavalry into woods, particularly where they can be ambushed by infantry and should also avoid positioning infantry in the open if there is some type of covering terrain available to break up a possible cavalry charge. Players should keep in mind both the standard tactics of the era and how they apply to the unique geography of the Austerlitz battlefield. The terrain around Austerlitz is characterized by rolling hills and fairly plentiful woods. The battle of Austerlitz occurred in December and the freezing temperatures hardened the ground, making movement a bit easier than it was on the muddy fields of Waterloo (which hampered both artillery and cavalry movement and employment). Most Austerlitz streams are easily forded and Sachsen Pond can be crossed since streams and ponds were frozen. Movement is generally not impeded by water in this game and only woods slow down maneuvers. Fog also obscured vision early in the morning so corps were maneuvering "in the blind" until the fog burned off. This weather condition is faithfully recreated in the game and is a factor when playing scenarios early in the day.
|
|
|
|
Breakaway Games' Austerlitz: Napoleon's Greatest Victory portrays the sweeping panorama of this pivotal battle. |
The center of the battlefield is the town of Pratzen, just at the foot of the Pratzen Heights. |
The Austerlitz Staff Ride
A quick orientation across the expansive Austerlitz battlefield is probably in order before exploring some of the more unique types of terrain and structures a player might encounter in any size scenario. The Austerlitz battlefield was oriented on a north-south axis parallel to the course of the Gladbach Stream, west of the city of Austerlitz. The most prominent terrain features are the Pratzen Heights which run north-south between Austerlitz and the Gladbach Stream, and the Sachsen Lake (frozen at this time of year) south of the Pratzen Heights. The primary line of communication is the east-west road running between Austerlitz and the city of Brunn to the west and this road generally marks the northern boundary of the battle. A significant amount of commercial and passenger traffic traveled on rivers in the 17th and 18th centuries, so there are several towns and cultural features along the Gladbach.
The southernmost town along the Gladbach flowing from Sachsen lake is Telnitz and just to its north is the town of Sokolnitz, immortalized by the nearby castle. Near the castle was a large walled and forested game preserve called the Pheasantry. Aujest Markt is just to the east on the ba-nks of the Sachsen. Several small and medium scenarios which occur in this Telnitz-Sokolnitz area depict clashes between advance elements of Davout's corps and Soult's corps (primarily LeGrande's division) against Russian forces under Lichtenstein, Kienmayer, and Doctorov. These divisions were encamped near the Hostieradek marshes east of the Gladbach along the Littawa stream which flowed northeast through the lake just south of Austerlitz and eastward along the road connecting Austerlitz to Vienna.
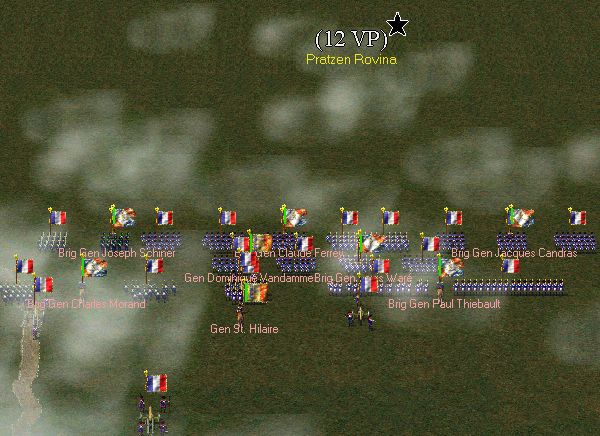
The center of the battlefield is the town of Pratzen, just at the foot of the Pratzen Heights, with the town of Kobelnitz and a small pond to the west of Pratzen on the Gladbach. The Chapel of St Anthony was a prominent cultural feature on the Pratzen Heights ridgeline and several scenarios occur near Kobelnitz. Just north of Kobelnitz on the Gladbach is Puntowitz, which sits at the confluence of the Gladbach and Bosenitz Stream, which runs to the northeast across the Brunn Highway. Forces which contested this area varied depending on the time of the battle, but it was generally the focus of several corps maneuver efforts as forces were committed during battle. The northern component of Soult's corps (St Hilaire's and VanDamme's divisions) primarily opposed Langeron's division from Kollowrath's corps at the beginning of the battle. It later became the objective of Buxhowden's corps and Constantine's Imperial Guard. The center area was bounded by Krzenowitz which was just west of the lake and city of Austerlitz.
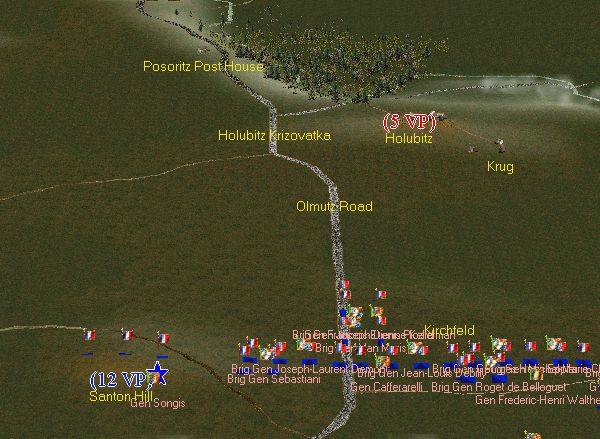
The northern sector was situated along the Olmutz-Brunn Highway, with Santon Hill just west of the town of Bosenitz (Bosenitz Stream flows through it). Posoritz Post House marks the eastern edge of the area, where the road forks toward either Olmutz to the northeast and Austeritz to the southeast. The highway would naturally become a contested objective for the extensive cavalry forces on both sides; the northern sector features battles between Murat's Reserve Cavalry Corps and Lichtenstein's Russian Cavalry Corps, plus the infantry forces of Lannes' and Bernadotte's corps and Napoleon's Imperial Guard opposing Bagration's advance guard. The Santon hilltop became a fairly famous site for large French artillery forces.
|
|
|
Fog also obscured vision early in the morning so corps were maneuvering "in the blind" until the fog burned off. |
The Santon hilltop became a fairly famous site for large French artillery forces. |
Unique Tactics For Unique Terrain
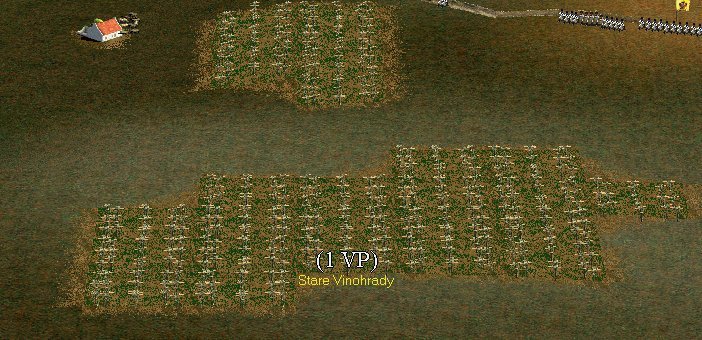
Vineyards. One terrain type players may not have previously encountered (not seen in Waterloo: Napoleon's Last Battle) are vineyards, and these vineyards appear in scenarios which occur around the south and central sectors of the Austerlitz: Napoleon's Greatest Victory game maps. Vineyards are the salvation of the infantry and artillery, and not just for the refreshing vintage they provide, but in reality they are "cavalry-proof" yet still permit the infantryman or artilleryman to freely see and fire. Two scenarios that feature vineyards as a centerpiece terrain type are the "Constantine's Imperial Guard" and "Where is Friant?" Expect these footsoldier sanctuaries to be hotly contested in any battle near them; the best advice is to advance rapidly to situate a brigade or so within them before the opposing force can do the same. Once emplaced, only a deliberate infantry attack (ideally with some artillery support) can displace them; cavalry will have to sit idly by and watch! The Stare Vinohrady is one of the larger and more important vineyards on the Austerlitz battle map.
|
|
|
|
Stare Vinohrady is one of the larger vineyards on the Austerlitz battle map. |
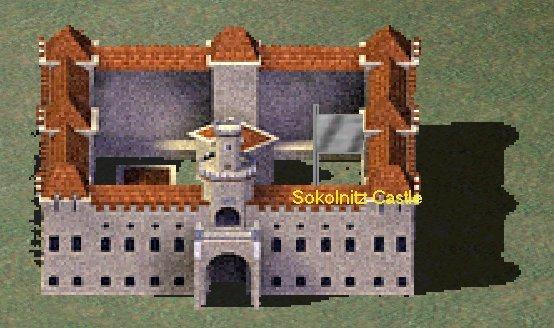
Sokolnitz Castle is a key objective for both forces to either hold, take, or deny. |
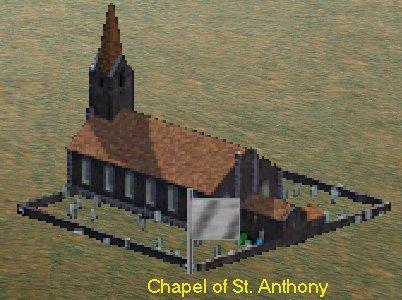
Structures: Sokolnitz Castle, Telnitz Church, and the Chapel of St Anthony. These structures can each internally house one infantry battalion and play fairly prominent roles in the scenarios in which they are featured. The town of Telnitz is relatively unique since it has fairly expansive view of vineyards on one side of town, opposite the Telnitz Church. One battalion can be emplaced inside the church while the other battalions of the brigade dig into the town structures for cover. This urban terrain severely restricts the introduction of cavalry so expect an infantry-artillery clash in the town and vineyards. Medium and large scenarios featuring Telnitz typically contain fairly significant cavalry forces (particularly on the French side) so these must necessarily operate in the fringe areas away from the town of Telnitz. Sokolnitz Castle is situated between the city of Sokolnitz and the Pheasantry and it is a key objective for both forces to either hold, take, or deny. The castle can protect one battalion from attack by a larger force but unless the battalion is fairly large with good morale and cohesion (well-led by nearby leaders) it can't hold out indefinitely from a determined brigade onslaught. Artillery fire against the castle can also set it ablaze, so the attacker may elect to capture it using infantry if he intends to use it as a desirable position for friendly forces after being taken. Overlooking Sachsen Pond from the center of the bare Pratzen Heights, the Chapel of St Anthony is also a key defensive position and vital tactical objective. No other covering terrain on the Pratzen Heights is in proximity to the Chapel, so friendly forces supporting the battalion inside the Chapel will be vulnerable to open attack by any type of force (particularly cavalry and/or artillery).
|
|
|
|
Chapel of Saint Anthony |
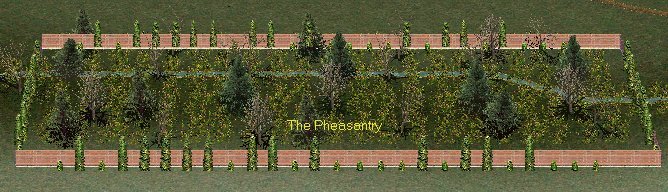
The Pheasantry. |
The Pheasantry.
The Pheasantry was a walled, wild game preserve which was thick with trees so game birds and small game animals could find shelter and food. The walls were never intended to be impermeable and were built to facilitate hunter and gamekeeper access, so expect forces to enter and exit from any direction. The Pheasantry typically carries several victory points and lies in strategic proximity to Sokolnitz Castle and the city of Sokolnitz, near the river. The Pheasantry offers good cover for infantry from cavalry charges and also can provide artillery with a fairly secure firing position if sited along the outer wall or corner. The thick vegetation of the Pheasantry makes infantry maneuver and combat very close, desperate, and relatively hidden from the player. It spells almost certain death for any cavalry units positioned inside the Pheasantry to covert infantry attack.
High Terrain: Santon Hill and Pratzen Heights
Up in the northern sector, a few miles west of the Posoritz Post House and the city of Holubitz lies Santon Hill. This strategic large promontory overlooks a commanding view of the entire northern area and is an outstanding position for a large artillery battery. Marshal Lannes and Bernadotte placed several batteries on this hill and it was hotly contested during the battle because of its strategic position and view. Santon Hill was also conveniently located just ahead of the positions for the French Imperial Guard and Napoleon's other reserve formations, and thus helped mask their location from enemy view.
Much of the historical accounts of Austerlitz focus on the key Pratzen Heights engagements, and this area changed hands several times during the battle. This range of high terrain overlooked most of the battlefield and as a result was the center of most maneuvering and combat. Whichever scenario one plays, if the Pratzen Heights are part of the map, expect to see lots of action there. Much of that action may center on the Chapel of St Anthony, as described in previous paragraphs.
|
|
|
The game rewards sound tactical doctrine, particularly combined arms teamwork and skillful use of terrain. |
Austerlitz: Napoleon's Greatest Victory is a superb wargame for learning more about Napoleonic combat in general or this pivotal battle in detai l. |
Conclusion
Austerlitz: Napoleon's Greatest Victory is a superb wargame for learning more about Napoleonic combat in general or this pivotal battle in detail. The game rewards sound tactical doctrine, particularly combined arms (infantry, cavalry, and artillery) teamwork and skillful use of terrain (it is also extremely fun to play!) The smaller scenarios are simple and somewhat basic while the massive and large scenarios can be overwhelming to play; medium (divisions with a couple of brigades) tends to be the optimal single-player scale and seems "just right". Playing the full battle of Austerlitz scenarios (actual and hypothetical) truly makes the player appreciate the complex tactical genius of Napoleon as a brilliant field commander. Most players will find the greatest satisfaction in playing the massive scenarios as corps commanders in the multiplayer mode with several other players; otherwise the span of control problem gets to be unmanageable. There are just too many corps and sectors to command and the large formations of forces on both sides tends to produce a maneuvering battle which can quickly flow between the various areas. Tactical focus can rapidly produce strategic disaster.
Players would be wise to maneuver cautiously at first and wait to see how the enemy
will commit large division-size forces and corps. Pressing ahead recklessly
without lots of support (both infantry and cavalry wherever possible)
may result in a division or more being annihilated; this can easily and
quickly happen in any of the sectors of the battlefield. The old saying
"Timing is everything" certainly applies to fighting this battle,
particularly at the largest scales. Battle strategies are fundamentally
based on friendly force capabilities, environmental factors, and specific
actions of the enemy force. Hopefully this article helped familiarize
readers with a quick overview of the epic battle and a few of the unique
features of the Austerlitz battlefield in December of 1805. The best way
to really start learning indepth about the battle of Austerlitz is to
get a copy of Austerlitz: Napoleon's Greatest Victory and start playing!
About the Author
Gary "Mo" Morgan is no stranger to wargames, computers, or the Age of Fighting Sail. Mo was the designer of Avalon Hill's Flight Leader: Game of Air to Air Jet Combat Tactics, 1950 to the Present and Tac Air board wargames during the 1980's and won a Charles S. Roberts award for Tac Air. Mo also designed the Borodino: Doomed Victory issue game for Strategy & Tactics magazine and his companion article on Borodino won another Charles S. Roberts award. He served as a U.S. Air Force fighter jock spending 23 years as an electronic warfare officer in F-4 Phantoms and related staff, instructor, and test director assignments both stateside and in Germany. He retired from the Air Force as a Lieutenant Colonel in 1997. Mo is currently the producer of The Wargamer's Age of Sail historical section and his NelsonWeb is a featured reading resource on this famous naval genius, based on Mo's research in Greenwich and Portsmouth, England.