"Abandon Ship !"
The Sunda Strait Battle, February-March 1942
This battle was not at all like the battles that had been fought in the previous month, when there were organized
squadrons with a general directive facing the enemy. This battle
consisted of several of the bigger warships that had survived the Dutch
East Indies Campaign and now tried to escape out of the trap before it
closed. Unfortunately, none of these ships would succeed and all went
down, usually with heavy loss of life.
These ships were there as a result of Admiral
Doorman's final order in the Battle of the Java Sea. They arrived in
the morning of February 28th, and immediately tried to obtain oil and
ammunition. They could get the first, although not without effort, but
ammunition, that they so badly needed, was not available. At this time,
the Perth only had about 20 rounds per gun left, the Houston
only 50 rounds. If they got into a fight, it was sure they wouldn't
last long. They were battle-ready that night and left the harbour at
about 1900 hours, and Captain Waller, the highest in rank, decided to
sail directly to Sunda Strait, without making a curve around the
invasion forces as Admiral Helfrich had ordered. This was the shortest
way, but also the most dangerous. The Japanese had landed in Bantam
Bay on the north coast of Java, at Merak in Sunda Strait and at Eretan
Ewan, east of Tandjong Priok. The two allied cruisers had to deal with
the escorting squadron, which was devided into three groups: One was of
the invasion force for Merak and consisted of the light cruiser Yura
and four destroyers, the second was the invasion force at Bantam Bay
and consisted of 1 cruiser and 11 destroyers and finally, the support
group in the Java Sea, with the light carrier Ryujo, the heavy cruisers
Mogami, Mikuma, Kumano and Suzuya. Mikuma and Mogami
were cruising very close to the landing site in Bantam Bay. There was
also an invasion force at Eretan Ewan, but that one took no part in the
final destruction of the Allied ships. The Perth and Houston, as said,
sailed at top speed directly to Sunda Strait and encountered at about 22.30 the Japanese destroyer Fubuki,
which guarded the Eastern approaches. She fired her 9 Long Lance
torpedos at about 3000 yards and retreated. The cruisers now saw the
invasion force in the Bantam Bay and fired on the several dozen
transports there. At that time, there were two destroyers in the bay
and those immediately tried to make smoke screens to protect the
transports. Nevertheless, the Allied cruisers scored hits on the
transports, but no ship was sunk. At this time, stronger Japanese
forces were closing in on the small squadron, but the only result was
hits on Japanese warships and none on the Allied. This was soon to
change. Japanese destroyers fired about 28 torpedoes, of which luckily
none was a hit. The Perth and Houston replied with rapid gunfire and in the case of Perth,
also torpedoes, and managed to score several hits on the destroyers, but
were themselves also slightly damaged by gunfire. But the heavy
cruisers Mogami and Mikuma arrived at the battle. Their 8 inch shells stradled the Perth and Houston
and they also fired torpedoes. At about 23.20, the allied cruisers were
out of ammo and now could only hope to reach safer waters by high
speed. Japanese torpedoes were flying all over the place, and
scored one hit on Perth, later followed by another two. This
resulted in heavy loss of life, especially in engineering. Waller
ordered 'abandon ship', but the Perth received her fourth hit, which was too much for her.
She sank and took half the crew with her. By this time, the Houston
had also received several hits, including vital hits. A whole gun salvo hit
the aft engine room where the high pressure steam killed almost
everyone. The central fire control system was down along with one of
the forward 8 inch-turrets. At about 00.20, the last operational turret
was hit and Captain Rooks ordered the forward magazines flooded.
Without the heavy guns, she now fought a useless battle. But she
still had her 5-inch guns and her machineguns and continued the fight.
At about 00.30 three torpedoes hit the Houston on her starboard
side. The water entered the ship from all sides and Rooks ordered
'abandon ship'. Captain Rooks died when he was hit by a part of a
machinegun foundation. He died in the arms of his officers. Commander
Roberts noticed that the Houston still had a lot of speed and
decided to delay abandoning the ship. The guns were still firing at
this time, but the ship was lying dead in the water and the Japanese
destroyers took the decks under fire with their machineguns. The Houston sank and took two thirds of its crew with her. Only about 368 of a crew of over a 1000 were taken prisoner.
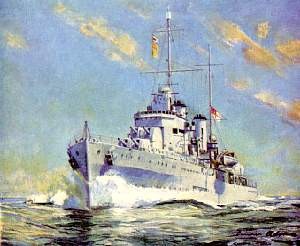
Australian light cruiser (HMAS) Perth

"The Galloping Ghost of The Java Coast"
USS heavy cruiser Houston (CA-30)
The Evertsen had joined the Western Striking
force in her sweep in the direction of Banka Strait, but had lost sight
of it on the way back. She returned to Tandjong Priok and awaited
orders. She saw the Perth and Houston leave Tandjong Priok and received from the Perth
the order "Take station one mile ahead of me". At that time, Evertsen didn't have engine power and
couldn't follow the order, and had to leave an hour after the Perth and Houston did.
She officially received orders from Helfrich to escort Perth and Houston,
but both of the cruisers were nowhere to be seen. She set course for
Sunda strait, trying to catch up with them. After several hours, she
saw star shells light up and tracers flying all over the place. The
captain decided not to get involved in this and to try to get around
the fighting ships and pass Sunda Strait. All went well until the
island Dwars in de Weg. She encountered two ships at high speed and
thought it to be the Perth and Houston, but one of them turned on a search light and opened fire. Evertsen
altered course away from the ships and managed to lose them. The
captain decided to try again, but now on a more easterly course. After
re-entering Sunda Strait, she again encountered the two ships. These
ships, the destroyers Murakumo and Shirakumo, who were on
patrol to protect to southern flank of the Bantam Bay landing site,
immediately opened fire which was very well aimed from the beginning.
The Evertsen only had two of her three boilers working, since
the captain found it to be too dangerous to also use the third one,
because of the smoke it would cause. The Evertsen laid a
smokescreen and altered course away from the Japanese. The firing
stopped when she was no longer in sight, but she had received no less
than 7 hits in a very small amount of time. One of them had caused a
fire on the stern which the fire brigade couldn't extinguish and one
hit the forward boiler room, so speed was reduced. The Evertsen
tried to escape by taking a course very close to Sumatra, but the
Japanese destroyers closed in again and opened fire again. The fire
control system was down, the fire was reaching one of the magazines,
which couldn't be flooded and the crew was untrained. All of this led
to the decision to beach the ship on a coastal reef near Seboekoe
Besar. The torpedoes were fired and the secret codes thrown overboard. From
there the crew escaped to land and when the fire reached the aft
magazine, it exploded and blew off most of the stern. Most of her crew
were taken prisoner on March 9 or 10 1942. Some small groups left the
island to go to Sumatra, but most of them disappeared without a trace
or were massacred. The captain died as a POW in April.
The battle of Sunda Strait was an unknown one for most
of the war. The crews of the ships were taken prisoner and initially,
the allies had no idea what happened to them. Only of the Evertsen was known she was beached,
as she signalled it to Helfrich, but of the Perth and Houston, no such signal went out.
Only the fact that several years later a Japanese transport with Australian survivors of the Perth
was torpedoed, and the Australians rescued, shed some light over what happened to the Perth.
There was no account of what happened to Houston at that time.
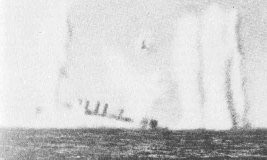
USS destroyer Pope, being sunk by gunfire from Japanese heavy cruisers, 1 March 1942.
The battle of Sunda Strait is one that symbolizes the whole Netherlands East Indies campaign. It was a battle of struggle against a superior enemy and with the same outcome: the destruction of the allies. The Japanese didn't suffer much damage: no ships were sunk except those by their own hands: a minesweeper was hit by a torpedo from heavy cruiser Mogami and was blown to pieces, along with a transport ship, the Sakura Maru. Three other transports were damaged by their own side's torpedoes. Again, the Imperial Japanese Navy triumphed over the Allied navies in a battle, but it would be one of her last.
Forgotten Campaign: The Dutch East Indies Campaign 1941-1942
Copyright © Jan Visser 1999-2000