Register a SNAP EBT card with Amazon
|
by David Horner an excerpt from Chapter 13 13 |

Map 20 The conquest of Malaya, December 1941-January 1942. The Japanese landed at Kota Bharu on 8 December 1941 and advanced down the west coast before meeting the Australians at Muar and Gemas, in Johore, in mid-January. By 31 January the British force had withdrawn to the island of Singapore.
|
A 25-pounder of the 8th Division Artillery firing beside a rubber plantation in Johore in January 1942. The 2/15th Field Regiment received its 25-pounders in November 1941, and the 2/10th received them the following January. (AWM 11303/30)
upon any soldier who even slightly damaged a rubber tree.[8] In November, shortly before the Japanese attack. Lieutenant-Colonel Walsh, who had been BMRA for the past year, was appointed the new Commanding Officer. Defensive positions were being established in the Mersing area, but the unit was not re-equipped with 25-pounders until 2 January 1942.[9] Training and calibration was carried out between 13 and 18 January and the first operational shoot took place three days later. Equipped with 3-inch mortars, the 2/15th Field Regiment had
arrived in Malaya in August with the 27th Brigade. In November the Commanding
Officer, Lieutenant-Colonel ONeill, was killed in a motor accident and Major
John Wright, the second-in-command and a First World War veteran, was promoted
to take command.[10]
The same month new 25-pounders began to be issued. The 4th Anti-Tank Regiment
had similar problems with equipment, and in early December had twelve 2-pounders and 24 75-mm guns;[11] with three batteries it normally would have had 48. As the Japanese advanced down the peninsula the British army commander, Lieutenant-General Percival, reorganised his force, placing Bennett in command of Westforce with the task of defending western Johore. Bennett had the 9th Indian Division, his own 8th Division (less the 22nd Brigade) and an additional Indian infantry brigade. The 27th Brigade was supported by the 2/15th Field Regiment with the 4th Anti-Tank Regiment and the 80th Anti-Tank Regiment RA providing anti-tank defence, to which great importance was attached after the experiences of northern Malaya. The 22nd Brigade with the 2/10th Field Regiment remained in eastern Johore as Eastforce. The jungle terrain and the Japanese tactics posed particular problems for the artillery. They were restricted to the roads and observation was difficult in the thick terrain. Communications were strained as Japanese infiltration parties cut the telephone lines from observers to gun positions, while radios were unreliable, in short supply and vulnerable to Japanese jamming tactics. Reliance on despatch riders was hampered since the RAA units possessed only 30 per cent of their motorcycle quota.[12] Expecting close fighting the CRA recommended that each RAA unit be issued with Molotov cocktails, hand grenades and bayonets for all rifles. The gun positions were also vulnerable to enemy air attack since there were few Allied aircraft and the Australians had no anti-aircraft artillery of their own. The tall jungle trees presented crest clearance problems, although the 25-pounder was better in this regard than the 18-pounders. Other difficulties were posed by the heat and humidity-for example, the fogging of optical sights. These problems were evident in the first contact on 14 January when the 2/30th Battalion conducted a successful ambush against the advancing Japanese at Gemas. The telephone line to the 30th Battery, 2/15th Field Regiment, in support, was cut by the Japanese, radios were not available, and the planned artillery concentration was not fired. Next day the field battery plus an anti-tank battery helped defend the main battalion position against a Japanese attack and destroyed four Japanese tanks. A troop of 25-pounders was placed well forward and engaged the enemy over open sights. Lance-Sergeant Kenneth Harrison[13] was the commander of one of the two anti-tank guns that held up the Japanese attack down the main road. The first Japanese were in a small carrier which was struck immediately. As Harrison described it:
Japs began pouring out, but as they were running in all directions our second shell crashed home, and the carrier rose in the air and toppled on its side. It lay there with men crawling out like wood bugs from a burning log... no sooner had we toppled the carrier than a large tank appeared, stopped behind the other, now almost burnt out in the centre of the road, and started blazing away at us. It was a most difficult target, as only the turret was exposed, so I asked [Gunner] Jock Taylor, the loader, to change to armour-piercing shells, and instructed [Gunner] Joe Bull[14] to fire right through the burnt out tank. As we were trying to crash through, two more tanks ranged up, one on each side of the derelict, and began to give us the works in toto... After six or seven shots had crashed through the derelict, the rear tank suddenly burst into flames and we had a momentary glimpse of the turret flying open... The battle continued with the tanks and anti-tank guns exchanging shots. By this time the gun detachment had been reduced to just Harrison and Bull, the others having being killed or wounded. Harrison slammed another shell into the breech, tapped Joe on the shoulder, and then stood peering hopefully at the inferno up the road. Then there was a whoomp and a flash from the cutting, and something screamed by like an express train. This was followed by a deafening roar as Joe fired back at where a red flash had momentarily appeared amid the drifting pall of smoke; the breech flew open, hurling acrid cordite into our faces, and then the process started all over again... after a while the fire died down. The last shot was fired at us; Joe fired back and did not miss. Either that, or they had had enough for one day. In any case, we were left in possession of the field. Our heads were ringing but unbowed, and we had exactly four shells.[15] While the battle of Gemas was underway a major Japanese thrust was developing towards Muar on the west coast, where the 45th Indian Brigade was supported by the 65th Battery, 2/15th Field Regiment (Major William Julius[16]). Soon the force at Muar was reinforced by the 2/29th and 2/19th Battalions and a troop of the 4th Anti-Tank Regiment. The commander of the anti-tank troop, Lieutenant Russell (Bill) McCure,[17] received an unexpected welcome from Lieutenant-Colonel Robertson, the Commanding Officer of the 2/29th Battalion: I have orders from the General that I should be accompanied by a troop of anti-tank guns, but as far as I am concerned, youre not wanted. I dont want you to interfere with us in any way. I dont expect the Japanese to use tanks, so for my part you can go home.[18]
Ignoring orders, McCure deployed his guns in the 2/29ths position. Before long the brigade came under sustained enemy attack with the
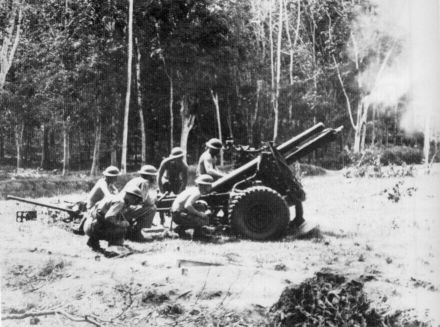
A 2-pounder of the 13th Battery, 2/4th Anti-Tank Regiment in action against Japanese tanks at Bakri on 18 January 1942. The forward tank has been set on fire while tanks on the other side of the road block, which is a felled tree, have been disabled. (AWM 40367)
artillery firing continuously, and on 18 January an enemy force with tanks approached the rear of the 2/29ths main position, forward of Bakri. They were met by two anti-tank guns. When the first tanks were side-on to the foremost gun, its commander, Lance-Sergeant Clarrie Thornton,[19] gave the order to fire. We hit it and moved quickly on to the second tank. We got direct hits on both tanks, but we were firing armour piercing (A.P.) shells and they seemed to go straight through them.[20] He called for high explosive rounds and McCure and his batman brought them forward. As McCure recalled: Each time I dumped a container at their gun, I gave Clarrie a slap on the shoulder and urged him on. He was doing a great job and his crew seemed to be crazily enjoying the action, completely ignoring the danger of the battle raging on them.[21] Although wounded, Thornton directed the fire from tank to tank. In an outstanding
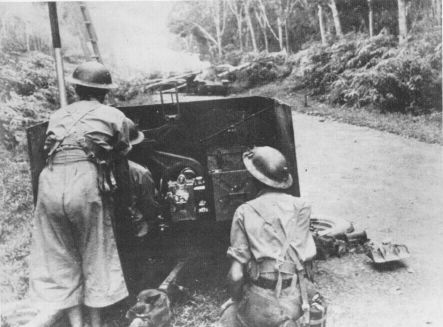
Three tanks destroyed by Australian anti-tank gunners at Bakri on 18 January 1942. (AWM 11301) display of coolness and courage the anti-tank gunners destroyed eight Japanese tanks and helped stop the attack. Soon after the anti-tank battle Lieutenant-Colonel Robertson was severely wounded. He summoned McCure, and the two men looked at each other in the gloom of the rubber trees. McCure erect and strong, Robertson crumpled on a stretcher.[22] Im so sorry that I acted as I did, said Robertson, Only for your persistence in defying my orders and positioning your guns where you did, there would have been wholesale slaughter.[23] Ten minutes later he was dead. On 19 January, in a heavy air attack, Major Julius was
mortally wounded and Lieutenant John Ross[24]
took command. The withdrawal of the force down the road to Parit Sulong over
the following three days became one of the great epics of Australian military
history, with the Australian artillery playing a key role in both the advance
and rearguards. The road passed through patches of jungle and open swamp and
the Japanese had cut off the escape route. In one of the early attempts to break out the brigade commander was killed and Lieutenant-Colonel Anderson of the 2/19th Battalion took command. His battalion was leading when it struck strong resistance on the road. According to the war correspondent, Gilbert Mant, Every man was fighting mad. Mortar shells were directed on to targets by infantrymen a few yards away. Gunners of 2/15th Field Regiment were fighting with rifles and bayonets and axes.[25] The first road block consisted of three trucks sited just behind a slight bend. As Mant recorded, A 25-pounder was pushed, muzzle first, around the bend and three rounds were fired at 75 yards range: the trucks were actually blown off the road, except for an amount of riddled iron sheet and chassis parts which were cleared by hand. Beyond this block was a second, made from rubber trees. This was also shattered by gunfire and then demolished with axes.[26] In the evening of 21 January, with the force halted at Parit Sulong, the rear of the column was attacked by Japanese tanks. According to one observer: Into the light from the burning limber came a tank, big and menacing, the first of a column stretching back into the darkness. The leader stopped in the light of the fire... Suddenly the reply came. Hand grenades blasted and a 25-pounder high explosive shell crashed into the first tank, followed by another.[27] Lieutenant Ross and Sergeant Bert Tate[28] together manned a 25-pounder and successfully engaged the tanks under most difficult conditions, the leading tank being engaged at a distance of less than 50 metres. When ammunition was expended Ross crawled along a drain and put one tank out of action by throwing a hand grenade into its tracks. However, Gunner Russell Braddon,[29] always cynical about rank, saw the incident differently: I looked around. There, not more than twenty yards away, working at the gun, silhouetted by the glare of the lurid fire, was a solitary figure. With great deliberation, he lined up the barrel of the gun and-in absence of any sight-looked along it... Seconds ticked into minutes. He straightened up, apparently satisfied that his aim was good. But, as a precaution, in case he missed, he went to the nearest truck and found another shell. Then, returning deliberately, he looked to see that his line was still clear and fired. The blast from the gun joined the blast from the tank as the shell hit it-one long sheet of blinding flame... The second shell, with scant respect for the might of Nippon,
was dispatched the way of the first and shattered the next tank down the road
(now well lighted up by the flames coming from its predecessor). Those tanks
which lay farther down waited no longer, but turned and fled... [Bombardier
Sydney] Piddington[30]
stammered his excitement. That was [Gunner] Jack Menzies[31] fired that gun, wasnt it? he asked. [Gunner Hugh] Moore[32] and I both said Yes... Should get half a dozen medals, Sydney said... Needless to say, he didnt-someone else did, but Jack didnt. Yet without that shot no one would have left Parit Sulong.[33]
On 22 January with escape routes cut and no chance of relief Anderson ordered his force to separate into small parties and try to escape. The gunners destroyed their guns and 98 members of the 65th Battery made their way back to Allied lines. Only four anti-tank gunners were successful. During this battle the 27th Brigade and the remainder of the 2/15th Field Regiment were forced south through Johore, while on the east coast the 22nd Brigade and the 2/10th Field Regiment withdrew under enemy attack. Facing a Japanese attack in the early hours of 27 January two batteries of the 2/10th fired 900 rounds in the first hour. By the morning of 31 January the Australian force was back on Singapore Island where preparations began to deal with the inevitable Japanese assault. The three artillery units reformed, took in reinforcements and prepared for action. By early February the 2/10th Field Regiment had 24 25-pounders and six 4.5-inch howitzers, while the 2/15th had sixteen 25-pounders, four 18-pounders and ten 4.5-inch howitzers; it had lost four 25-pounders, three 18-pounders and one 4.5-inch howitzer during the withdrawal. The batteries of the 4th Anti-Tank Regiment were expanded from three to four troops and the regiment had a total of 30 2-pounders, four Bredas and thirteen 75-mm guns.[34] The 8th Division was given responsibility for the western portion of the island and Bennett divided the area into three sectors. The Causeway Sector was to be defended by the 27th Brigade supported by the 13th Anti-Tank Battery and the 2/10th Field Regiment-it had formerly supported the 22nd Brigade. The 22nd Brigade was responsible for the Northwest Sector and was supported by the 15th Anti-Tank Battery and the 2/15th Field Regiment. The Southwest Sector was given to the 44th Indian Brigade supported by the 16th Anti-Tank Battery and the 5th Field Regiment RA. This was an inadequate artillery force to cover the
divisions area of responsibility. On the mainland the CRA had had little
opportunity to command his artillery as one unit, but on the island he
centralised command of the units. hoping to make fullest use of the flexibility
of artillery fire. However, the large distances to be covered and
communications weaknesses meant that in practice it was difficult to provide
concentrated artillery support. Against the wishes of Lieutenant-Colonel
McEachern, the anti-tank commander, seven of his guns were placed on the beaches to deal with enemy landing craft. They were therefore exposed, subject to enemy fire, and difficult to withdraw. The artillery battle began as soon as the Australians had withdrawn to the island, but it was an unequal fight. Malaya Command believed that ammunition should be preserved for a three-month defensive battle, and Bennett therefore laid down strict guidelines which required that fire be opened only after enemy had been clearly identified. Fire was also discouraged for fear of damaging Johore property. Gunner Ronald Houlahan[35] of B Troop, 29th Battery, 2/15th Field Regiment, wrote in his diary: Now [that] we are not allowed [to] fire on Johore Baru the Japs have a free hand in bringing up their guns. Makes one wonder whether we are really fighting the Nips fair dinkum. The way the Japs are bombing the infantry one cannot understand why in the hell we are here at all in the first place.[36]
On the night of 6 February and during late afternoon of 7
February the Japanese fire increased in intensity. According to a British
officer, it went up and down the front, held by the Australians on our right,
like a thunderstorm.[37]
The CRA, Brigadier Callaghan, was evacuated to hospital with malaria and
Lieutenant-Colonel McEachern acted as CRA throughout the ensuing attack. It
began on the night of 8 February and the artillery responded, firing
constantly. By the following morning the 2/15th Field Regiment had fired 4,800
rounds.[38]
The Japanese bombardment continued for fifteen hours and, as Lieutenant-Colonel
Varley of the 2/18th Battalion commented, During my four years service from
1914 to 1918 I never experienced such concentrated shell fire over such a
period.[39]
The defenders were driven back by Japanese attackers who were well supported by
artillery, aircraft and tanks. As they had done throughout the campaign, the
Japanese infiltrated the widely-spread Australian line, disrupting
communications, and by the morning of 9 February the 2/10th Field Regiment was
using six motor cyclists to transmit fire orders.[40]
The forward anti-tank guns were either destroyed by enemy fire or abandoned when
vehicles were not available to withdraw them. In confused fighting both the
field and anti-tank gunners were constantly in action, either in support of
their allocated brigades or being switched to support other units. According to
the history of the 2/15th Field Regiment, for 48 hours there was practically no
cessation of firing. At one stage regimental headquarters handled the fire
orders of some 70 guns in three field regiments calling for tasks of 100 rounds
gunfire on targets in the Bukit Timah Racecourse and High School areas - 7,200 shells in each case. The Japanese suffered terrible casualties-a tribute to the professionalism of the Australian gunners.[41] Meanwhile, forward field and anti-tank guns were instructed to fire at any tank they saw because the British had none. Several 2-pounders, mounted on 30 cwt trucks portee fashion, attempted to halt a Japanese tracked vehicle, but one portee gun received a direct hit, killing its commander. Other anti-tank guns were employed in a field artillery role. As the battle continued Army Service Corps troops were withdrawn from their normal duties and formed into improvised infantry units. This meant that ammunition was not brought forward and the gunners had to go back to the base ordnance depots to collect it. Gunner Cliff Whitelocke[42] recalled that, British Ordnance was being very pukka, indeed. A bombardier who went for supplies was told that it would only be issued on an order signed by his Battery Commander. The bombardier reported this to Capt. Lindgren[43] who took off his tunic, put it on the bombardier and said Youre the Battery Commander now. Try again. He did. No trouble this time.[44] Before long several ammunition dumps and stores were captured by the enemy and others were ablaze. Bennett ordered that AIF guns should only fire on observed targets, on counter-battery targets, and H. F. target where enemy troop and battery movements were definitely known to be taking place.[45] On 15 February the Singapore garrison surrendered and
Callaghan, just out of hospital, was promoted to major-general to command the
8th Division in captivity, Bennett having escaped to Australia. During the
month-long campaign the Australian casualties totalled 18,490, of whom 1,789
were killed, 1,306 wounded and the remainder became prisoners of war. Battle
casualties in the artillery were significant. The 2/10th Field Regiment lost
six killed, three missing and eighteen wounded.[46]
The 2/15th lost 24 dead, twelve missing and 57 wounded, with 75 per cent of the
casualties being incurred by the 65th Battery.[47]
The 4th Anti-Tank Regiment had at least eleven killed, 34 missing and 37
wounded. These battle casualties were proportionally greater than those
suffered by the AIF artillery units in the Middle East. By comparison, during
the seven-week Syrian campaign the four artillery regiments of the 7th Division
together lost a total of nineteen killed. The 7th Divisions average ammunition expenditure was about 47,000 rounds per field regiment. In the Malayan campaign, which was some three weeks shorter, the 2/15th Field Regiment fired 45,110 rounds. [48] The gunners fought bravely, but the dispersed operations in Johore prevented the artillery from being concentrated to provide maximum fire support. Similarly, on the island command and communication problems and ammunition restrictions meant that the artillery was not used to full effect. After the surrender the Australians were to suffer cruelly at the hands of their Japanese captors, with about one third of their numbers dying in captivity. Over 290 of the 2/15th Field Regiments and more than 170 of the 4th Anti-Tank Regiments prisoners of war died during this period. The survivors were to suffer for many more years as a result of their experience. In terms of intense combat, battle casualties and suffering in captivity, no gunners in the history of Australian artillery faced a more severe trial than those who served in Malaya and Singapore. PREPARING TO RESIST INVASIONThe fall of Singapore was just one, although admittedly the most dramatic, of a series of events that brought home to Australians that their country faced the imminent threat of invasion. The first event was the Japanese seizure of Rabaul on 22 January, after several days of intense bombardment from the air. Although Selbys anti-aircraft battery of two 3-inch 20-cwt guns provided defensive fire, the 6-inch coast guns at Praed Point were put out of action and could not prevent the Japanese from landing. The garrison commander decided to withdraw and Selby was ordered to destroy his guns. They had been faithful friends to us, he recalled, we had nursed them through all the trials of that difficult climate and they had never failed us. Rounds were placed in each of the chambers and muzzles. Two gunners and I took cover, the gunners with the ends of the wires in their hands. They looked at me expectantly and I nodded. I could not bring myself to utter the word Fire.[49] The 17th Anti-Tank Battery fought in the withdrawal, but could not resist the Japanese for long. Some of the defenders escaped to the main island of New Guinea, but most were captured; few survived to the end of the war. Next, the Japanese landed at Ambon on 30 January, which was defended by a small Dutch force and a battalion group of Australians. The only Australian gunners were a troop of the 18th Anti-Tank Battery. By 3 February most of the Dutch and Australians had been captured. That same day, with planes based at Rabaul, the Japanese mounted their first air raid on Port Moresby. At Darwin the defences had been strengthened at the end of December by the arrival of the 22nd Heavy AA Battery from Western Australia.[50]
|

Map 21 The Japanese advance through the Indies and to Rabaul and New Guinea, December 1941 to March 1942. Australian artillery units were captured at Koepang, Ambon and Rabaul and anti-aircraft units were in action at Darwin and Port Moresby.
|
With the 2nd and 14th AA Batteries the anti-aircraft defences consisted of sixteen 3.7-inch and two 3-inch 20-cwt AA guns, all under the command of Lieutenant-Colonel John Scott Young.[51] On 19 February the Japanese conducted two air raids on Darwin, the first of these causing the most damage. After the alarm was sounded at 9.55 a.m., Lieutenant Graham Robertson[52] went to a telescope in the 14th Battery command post. Recognising the Japanese planes he shouted to his men, This is no drill! This is fair dinkum![53] Captain Dudley Vose[54] of the 14th Battery commanded the first anti-aircraft gunners to go into action on the Australian mainland. On the day of the first raid I looked up and saw things dropping from the sky, glinting in the sun as they fell. I actually saw the bombs before I saw the planes. My men were at their posts the planes. My men were at their posts and in action before the air raid sirens sounded... We fired about 800 rounds from the 3.7 inch guns on the first day, but we were well below the target most of the time. Our equipment really wasnt up to it. We werent ready for the fact that the Japs were flying very high. [55] Gunner Des Lambert,[56] a recent arrival from Western Australia, was in the 2nd AA Battery orderly room when notification was received of unidentified aircraft approaching. I went outside and I shall never forget, I looked up into the sky and I saw formations of aircraft heading for us ... Id never seen ... so many aircraft before in the sky... Well then there was a mild panic because a lot of the gun crews were having showers at the time. We had been up early-we used to get up about five oclock and work on the cement mixers putting in the ammunition recesses around the guns. So anyway we hadnt received any warning at all until the aircraft were almost above us. Now the alarm went off and all the gun crews rushed over-some of the men only had a towel wrapped around them, but they were wearing their tin hats... Unfortunately, our guns at Berrimah had not been calibrated and consequently, every time that we shot according to our predictor, our shells were falling well below the Japanese aircraft and we didnt get any with the big guns. We were very disappointed indeed. It wasnt until subsequent air raids when our guns had been properly adjusted that we could get anywhere near the Japanese bombers.[57] Many of the gunners had never actually heard an
anti-aircraft gun fire until the first raid because, in a ridiculous peacetime
expedient, Army headquarters would not allow the expense of ammunition being fired-even for calibration. (Calibration is the process whereby the muzzle velocity of a gun is determined.) Nevertheless, they had shot down one plane.[58] A troop of ten Lewis guns, commanded by Lieutenant Donald Brown,[59] was credited with saving the oil storage tanks at Stokes Hill.[60] Gunner Bill Hudson[61] of the 2nd AA Battery, manning a Lewis machine-gun at Berrimah AA Station, recalled that the Japanese fighters were strafing the position around the oil tanks. We run straight to our guns ... they were flying tree top level and we could see them looking over the side, grinning at us, sort of laughing at us ... we had a go at them ... I got one... He was real close, he was coming over the trees. I could see him coming and cos we opened up on him ... He crashed a few, a couple of miles away from us.[62] Hudsons was one of only two Military Medals awarded for service within Australia during the war.[63] He carried his Lewis gun into the open to obtain a better field of fire and fired until ammunition was expended. About 250 people were killed, ten ships were sunk and 24 RAAF and US aircraft were destroyed during the two raids on 19 February. There was some panic among the civilian population and the RAAF ground staff, (although not as much as claimed in several books).[64] Mr Justice Lowe, who inquired into the circumstances of the raids, concluded that the anti-aircraft batteries operated efficiently and that the personnel of the AMF performed very creditably in their baptism of fire... the conduct of the personnel is to be highly commended.[65] There had been far too few anti-aircraft guns to defend a town the size of Darwin, and no Bofors were available for the low-level defence of the airfield or the gun sites. The Japanese air raid on Darwin was designed to cover landings at Dili in Portuguese Timor and near Koepang in Dutch Timor on 20 February. At Koepang the Australian force included an infantry battalion, the 2/lst Heavy Battery with two 6-inch coast guns and a troop of anti-tank gunners. In mid-January they had been joined by the 79th British LAA Battery. The Japanese bombers attacked the Australian heavy battery at the fort at Klapalima and the officer commanding, Major Wilson, was mortally wounded. With the destruction of their communications the two guns became ineffective and were put out of action by their detachments. The gunners then served as infantrymen during the fighting withdrawal. As Bombardier Tom Uren recalled, We had no infantry training whatsoever.[66] Meanwhile the 79th LAA Battery engaged the enemy aircraft, shooting down fourteen during the four-day battle. On 23 February, after suffering very heavy casualties, the Australian force surrendered. The Australian 2/2nd Independent Company at the eastern end of the island maintained a guerilla war against the Japanese for many more months, but the Australian artillery was not involved. With the loss of these forward outposts, plus the surrender in early March of the Allied force on Java, Australia now seemed open to Japanese invasion. However, in the middle of March General Douglas MacArthur arrived in Australia from the Philippines, where he had been commanding the US and Philippines forces. He was appointed Commander-in-Chief of the South-West Pacific Area, which included command of all the Australian and US forces in Australia. US officers were appointed to command the Allied Naval and Air Forces, but command of the Allied Land Forces went to General Blamey who had just returned from the Middle East. Initially neither MacArthur nor Blamey could do much to take the fight to the Japanese. The Australian militia units could not be sent to the forward areas until they were trained and equipped. The Allied Air Forces were short of modern aircraft and forward bases had to be constructed. Additional forces could not be deployed to New Guinea until sufficient shipping could be found to supply them, and until naval ships were available to protect the convoys. One of the early initiatives was to send Major-General Herring to Darwin to assume command of that forward area. Herring replaced many senior commanders and brought in officers from the AIF such as Brigadier Strutt, who took command of the artillery. The 2/lst LAA Regiment, just back from the Middle East, was deployed with two of its batteries, its 3rd Battery being sent to Port Moresby. The Commanding Officer of the 2/lst LAA Regiment, Lieutenant-Colonel Gibson, was appointed Anti-Aircraft Defence Commander, Northern Territory Force, which included the US 102nd AA Battalion, armed with .50 calibre machine-guns, that had been flown in from Brisbane. For the remainder of the year the anti-aircraft gunners were in action against Japanese bombers. Indeed between 19 February and the end of July there were 26 Japanese air attacks in the Darwin area.[67] Port Moresby also suffered from Japanese air raids with the 23rd AA Battery first returning fire on 16 February. No 4 gun had yet to be proofed and became the only gun to be proofed in action.[68] [1] Hasluck, The Government and the People, 1942-1945, p. 15. [2] ibid., p. 15. [3] Military Board Memoranda 18 December 1941 and 1 January 1942, AA: MP 729/6, item 37/401/738. [4] Hasluck, The Government and the People, 1942-1945, p. 38. [5] Lt-Col A. G. Fox, ED, (1894-1978), militia officer, comd 13 Fd Regt 1941-42, CRA NGF 1942. [6] Selby, Hell and High Fever, pp. 15-16. The Mandated Territory of New Guinea was not strictly part of Australia. [7] ibid., p. 15. [8] Braddon, The Naked Island, p. 37. [9] War Diary HQ RAA AIF Malaya, AWM 52, item 4/1/15. [10] Lt-Col J. W. Wright, DFC, (b.1892), company secretary and militia officer of Sydney, 12 LH Regt and 2 and 4 Sqns AFC lst AIF, comd 2/15 Fd Regt 1941-42, POW 1942-45. [11] Smith, Tid-Apa, p. 42. [12] War Diary HQ RAA AIF Malaya, AWM 52, item 4/1/15. [13] Sgt K. I. Harrison, (b.1918), storeman of Melbourne, 2/4 A-Tk Regt 1940-42, POW 1942-45. [14] Gnr J. Bull, (b.1918), truck driver, 2/4 A-Tk Regt 1940-42, POW 1942-45. [15] Harrison, The Brave Japanese, pp. 29-30, 32. [16] Maj W. W. Julius (1909-42), regular officer, 2/15 Fd Regt 1941-42. [17] Lt R. M. McCure, (1918-87), AIF officer, 4A-Tk Regt 1940-42, fought with British and Chinese Communist guerillas in Malaya 1942-45. [18] Account by McCure in Finkemeyer, It Happened To Us, p. 10. [19] L-Sgt C. W. Thornton, (b.1918), farmer of Berrigan, NSW, 4 A-Tk Regt 1940-42, POW 1942-45. [20] Account by Thornton in Finkemeyer, It Happened To Us, p. 32. [21] Account by McCure in ibid, p. 11. [22] Harrison, The Brave Japanese, p. 47. [23] Account by McCure in Finkemeyer, It Happened To Us, p. 13. According to Harrison (The Brave Japanese, p. 47), who was also there, Robertson said I was wrong. Terribly wrong. But for you and your guns not one of my boys would be alive now. [24] Capt J. F. Ross, MC, (1912-81), engineer of Newcastle, NSW, 2/15 Fd Regt 1940-42, POW 1942-45. [25] Mant, Grim Glory, p. 69. [26] Quoted in Whitelocke, Gunners in the Jungle, p. 90. [27] ibid, pp. 92-3. [28] Sgt B. Tate, DCM, (1905-44), barman of Sydney, 2/15 Fd Regt 1940-42, POW 1942-44. [29] Gnr R. Braddon, (1921-95), journalist and author, 2/15 Fd Regt 1940-42, POW 1942-45. [30] L-Sgt S. G. Piddington, (b.1918), audit clerk, 5 Hy Bde 1940-41, 2/15 Fd Regt 1941-42, POW 1942-45. [31] Gnr J. B. Menzies, (1917-94), cost clerk, 2/15 Fd Regt 1940-42, POW 1942-45. [32] Gnr H. J. Moore, (b.1921), bank clerk, 2/15 Fd Regt 1941-42, POW 1942-45. [33] Braddon, The Naked Island, pp. 74-5. The War Diary of the 65th Battery merely says that Sgt Tates gun engaged and destroyed an enemy tank. [34] War Diary HQ RAA AIF Malaya, AWM 52, item 4/1/15. [35] Gnr W. R. Houlahan, (b. 1912), carrier of Narrabri, NSW, 2/15 Fd Regt 1940-42, POW 1942-45. [36] Diary of Pte W. R. Houlahan, AWM, PR 88/052. [37] War Diary, 5 Fd Regt, RA Institution Library, Woolwich. [38] Wigmore, The Japanese Thrust, p. 327. [39] Quoted in Whitelocke, Gunners in the Jungle, p. 125. [40] War Diary 2/10 Fd Regt, AWM 52, item 4/2/10. [41] Whitelocke, Gunners in the Jungle, p. 130. In recognition of their heavy casualties, the Japanese erected their Singapore War Memorial in this area. [42] Gnr C. Whitelocke, (b.1910), grazier, 2115 Fd Regt 1940-42, POW 1942-45. [43] Capt M. A. Lindgren, (b.1904), 2/15 Fd Regt 1941-42, POW 1942-45. [44] Whitelocke, Gunners in the Jungle, p. 130. [45] War Diary HQ RAA, AIF, Malaya, AWM 52, item 4/1/15 [46] War Diary 2/10 Fd Regt, AWM 52, item 4/2/10. [47] War Diary 2/15 Fd Regt, AWM 52, item 412115. [48] ibid. [49] Selby, Hell and High Fever, p. 36. [50] War Diary HQ AA Defences, Darwin, AWM 52, item 4/14/8. [51] Lt-Col J. S. Young, (1900-52), regular officer, comd FD 7 MD 1940-41, AA Def NT L of C Area 1942, Fremantle AA Def 1942-44. [52] Lt D. G. Robertson, (b.1921), 14 AA Bty 1941-43. [53] Lockwood, Australias Pearl Harbour, p. 86. [54] Lt-Col D. H. Vose, (b.1915), CMF officer, AA (M) 1940-43, AA (AIF) 1943-45, comd 23 HAA Regt 1953-55, 16 HAA Regt 1955. [55] Quoted in Alcorta, Australias Frontline, p. 21. [56] Gnr D. A. S. Lambert, (b.1920), clerk, 7 Hy Bde 1941, 2 AA Bty 1941-44, 102 AA Regt 1944-45. [57] Transcript of interview in the Sir Keith Murdoch Sound Archives, S726, AWM [58] Hall, Darwin 1942, p. 90. [59] Maj D. N. B. Brown, MBE, (b. 1920), militia and regular officer, arty and inf appts 1942-47, 1951-63, comd 10 Cadet Bn 1963-65. [60] Lockwood, Australias Pearl Harbour, p. 88. [61] Gnr W. T. Hudson, MM, (b. 1920), 2 AA Bty. [62] Transcript of interview in AWM, MSS 0752. [63] The other was awarded to L/Bdr F. R. Wombley, 14 AA Bty, in the same air raid. AWM 88, item AMF 0/A1. [64] Powell, The Shadows Edge, p. 91. [65] Quoted in McCarthy, South-West Pacific Area, p. 71. [66] Uren, Straight Left, p. 19. Bdr T. Uren, (b.1921), regular soldier and later politician, 2/1 Hvy Bty 1941-42, POW 1942-45, MHR 1958-90, Min Urban and Regional Dev 1972-75, Deputy Leader of Opposition 1976-77, Min Territories and Local Govt 1983-84, Local Govt and Admin Services 1984-87. [67] Alford, Darwins Air War.. 1942-1945, p. 78. [68] On Target, With the American and Australian Anti-Aircraft Brigade, p. 61. |
Forgotten Campaign: The Dutch East Indies Campaign 1941-1942
Copyright © David Horner 1995