THE BATTLE OF LIEBERTWOLKWITZ Part II The campaign so Far by Peter Hofschröer Minature Wargames 39 Napoleon's "Grande Armée" had come close to beating the Allies (Russia and Prussia) in the Spring Campaign of 1813. He had snatched victory from the jaws of defeat at Lutzen (or Gross Goerschen as the allies called it) on 2nd May. He had pursued the defeated enemy and inflicted another defeat on them later that month at Bautzen. The Alliance was on the point of falling apart, but Napoleon negotiated an armistice because his army was plagued with two major problems which prevented him from inflicting a decisive defeat on the Russians and Prussians. Firstly, his cavalry lacked the numbers and was of too poor a quality to pursue the defeated enemy after a battle, and this prevented Napoleon from exploiting his successes. Secondly, the infantry he had conjured up after the extermination of his army in Russia in 1812 was too inexperienced and immature to withstand the rigours of campaign. His victorious army was simply too exhausted to continue the war. The allies, too, welcomed the breathing space. The Prussians had hardly started their mobilisation when they had to face their feared enemy. Now they could give their raw recruits at least a rudimentary training. It should not be forgotten that the Russians had suffered just as much from the 1812 campaign as the "Grande Armée" and needed to bring up re-inforcements and re-equip their much depleted army. Napoleon had thus come close to regaining his position of absolute power in Central Europe, but not quite close enough.
The summer of 1813 was a period of intensive activity by both sides. Both Napoleon and the Allies sought to gain further allies, particularly Austria as the participation of that great power would almost certainly tip the balance of power. Both Napoleon and the Allies brought up fresh troops and took the opportunity of improving the training of their armies. When the campaign of autumn 1813 started, Austria had joined the Allies, but Napoleon still had the initiative. Being based in Saxony, he had the advantage of operating from a central position against three allied armies, all approaching him from different directions and at different speeds. His plan was quite simple, to tie down two allied armies with small forces, then to concentrate the bulk of his forces against one allied army and crush it. This he attempted to do several times in August and early September, but his victory over the Army of Bohemia at Dresden was more than cancelled out by the defeat of his subordinates. The Allies' forces were divided into three armies for political and geographical reasons. Their strategy was also simple. They were to wear down Napoleon's forces by manoeuvre, withdraw when faced by the Emperor in person and concentrate their forces for the decisive battle at the opportune time. Time was what the Allies had. The longer the campaign went on, the more men they would have at their disposal. Napoleon, on the other hand, needed a quick victory. His lines of communication across a now rebellious Germany were precarious, he had exhausted most of his supply of manpower and the Allies were growing stronger by the day. Victory had eluded his grasp in August and September; by October time was running out for him. However, defeat was far from certain. The Allies had yet to complete the concentration of their forces. He was still in his central position in Saxony. He had one last chance left to strike out at each of the three armies individually. This chance he now took. That great battle took place in and around Leipzig and was called the "Battle of the Nations". Liebertwolkwitz was one of the preliminaries.
Napoleon had placed Murat in charge of the force which was to hold the Army of Bohemia in check whilst he (Napoleon) looked for an opportunity to strike at the Allies. Although Murat had only a relatively small army under his command, he was easily able to keep the main Allied army under the Austrian Schwarzenberg in check. This was largely because of the reluctance of the commander of the Army of Bohemia to undertake a determined offensive. There were two main reasons for this. Firstly, he did not feel that the situation was favourable enough and secondly, his government's political position restricted his actions. Austria feared that too decisive a defeat for Napoleon would so strengthen the position of Russia and her junior partner Prussia in Central Europe that Austria would he put in second place. However, a number of events tipped the balance in favour of the Allies and allowed Schwarzenberg to take the gamble of launching an offensive. The first event was news that Bavaria had come over to the side of the Allies. This meant an increase of about 50,000 men and, as Bavaria lay between Napoleon's army and France, the latter's position was now threatened. A determined advance may well cause Napoleon to retreat. The second event was news that the Army of Silesia under Bluecher was now at Halle. This was close enough to Napoleon to cause a serious threat and thereby attract Napoleon's attention, meaning that the Army of Bohemia could now advance into Saxony without such a great risk of strong counter measures by the French Emperor. The third event, if that is the right word, was Napoleon's lack of action and apparent hesitation. The Army of Bohemia went over to the offensive and gradually, over a period of days, forced Murat back towards his master. The Armies of Silesia and Bohemia drew nearer to each other, the Army of the North under the Crown Prince of Sweden was not far away and Napoleon decided that it was a case of now or never; he had to strike at the Allies before they could unite their forces. He moved his forces towards Leipzig and Murat. (See map of positions on 13th October 1813.) The Battle of Liebertwolkwitz took place on 14th October between Murat on the one side and Wittgenstein, commander of the Vanguard of the Army of Bohemia on the other, although the latter was joined by other elements of the Army of Bohemia during the course of the battle. Next month: Orders of Battle for Liebertwolkwitz 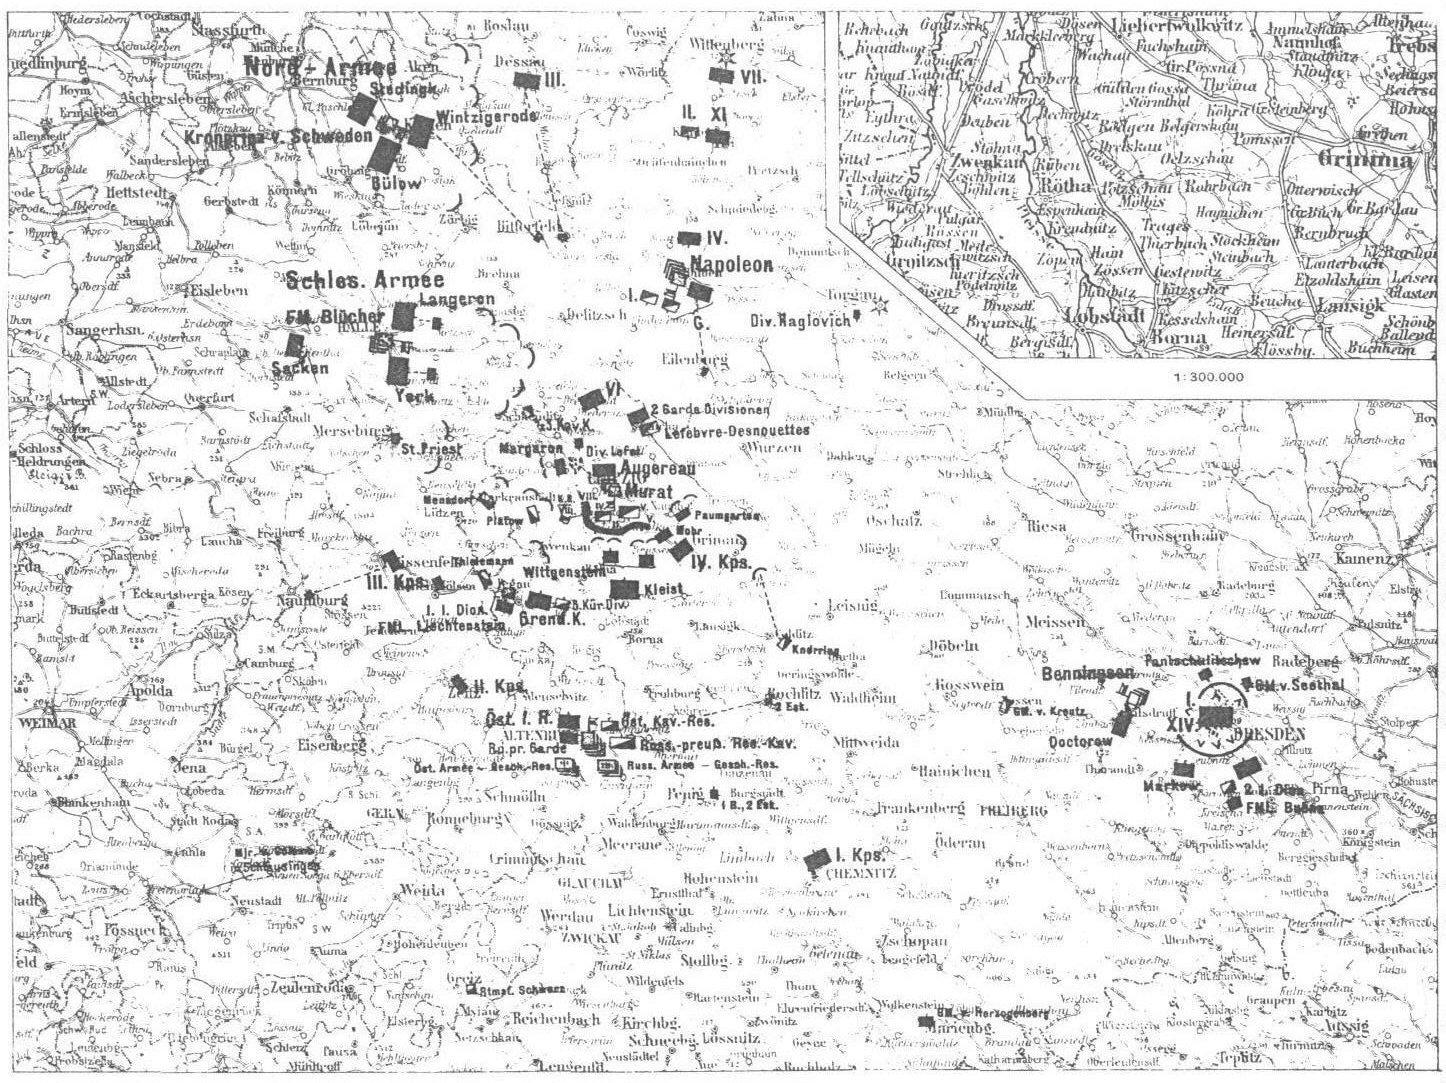
3) Map of the general situation on the evening of 13th October 1813. Unfortunately, this black and white reproduction is not quite as clear as the colour original. The French forces are at Dessau (III Corps), Wittenberg (VII, XI and II Cavalry Corps), with Napoleon, in and around Leipzig (Augereau and Murat) and surrounded in Dresden. The remaining forces shown are those of the allies. The critical situation on the eve of the Battle of Leipzig is apparent. For Napoleon it is a race against time to strike at one of the three allied armies before they complete their unification. The inset (top right of the map) shows the area in which the Battle of Liebertwolkwitz took place. More detailed maps of the battle will be included with the part of this series which describes the battle itself.
|